

Section: Module 6: Lesson 4: Solving General Triangles | Intro to Algebra & Trigonometry | NextGenU.org
-
Student Learning Outcomes:
Upon completion of this lesson, you will be able to:- Recognize the four cases for solving general triangles.
- Explain and use the law of sines to solve oblique triangles.
- Solve applied problems using the law of sines.
- Apply the law of cosines to solve oblique triangles.
-
Students mustMark as done
Required Learning Resources and Activities
-
-
Students mustViewRead Section 10.1.1: Use the Law of Sines to Solve Oblique Triangles - Pages 1060-1067. (25 minutes)
OpenStax, Rice University - 2015 -
Students mustView
Read Section 10.1.3:Solving Applied Problems using the Law of Sines - Pages 1070-1071. (7 minutes)
OpenStax, Rice University - 2015
-
Students mustView
Read the entire page (15 minutes)
OpenStax, Rice University - 15 minutes
-
Students mustViewStart discussions: 1
In this activity, you will construct a clinometer, use it in the field, and then use the data from your clinometer fieldwork to put into practice some basic principles of trigonometry.
Step 1. Prepare
A clinometer is an instrument from which an angle of inclination (or depression) can be read. It is used to give relative accurate estimations of height, distance, and width using trigonometry. To make one, you need to prepare the following:
- Heavy cardboard
- Clinometer patterns (given)
- A protractor
- String (light weight)
- Metal washer (or other weight)
- Split-pin (cotter pin) or other means of attaching the string
- A drinking straw
- Glue and/or strong, clear tape
- Tape measure
Step 2. Make
Proceed to making the clinometer by following the instructions below:
-
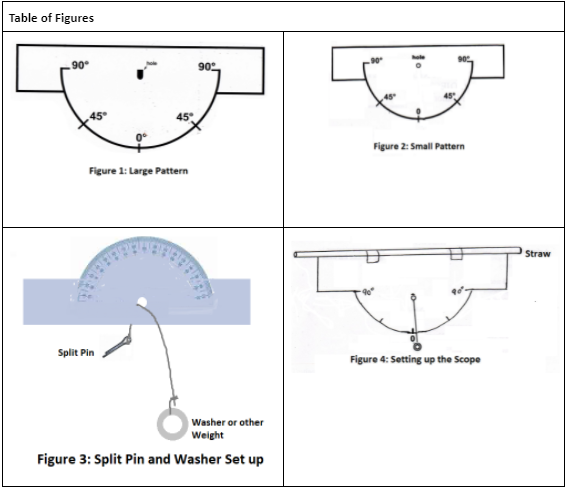
Use the protractor to accurately mark off the degrees on the clinometer pattern. If you cannot obtain a protractor that is large as the pattern in Figure 1, then make the markings from the protractor on the small clinometer pattern of Figure 2. Then use a copier machine to enlarge the small pattern to the size of the large one in Figure 1.
-
Paste the pattern for the clinometer onto your cardboard.
-
Cut around the edges of the pattern.
-
Cut a clean hole at the spot indicated in the pattern and on the cardboard behind it.
-
Attach the washer to the string and suspend the string from a split-pin inserted in the position marked “hole”, as shown in Figure 4. This is your plumb line.
-
Attach the straw, the “scope” to the rest of the clinometer as shown in Figure 3.
-
Test your clinometer by holding the clinometer with the scope side up. Make sure that the scope of the clinometer is parallel with the ground. The string should be lying across the zero mark (or as close to it as possible). As you tilt the clinometer, the string will move across the clinometer registering different angles. Your clinometer is now ready for use.
Step 3. Use
There are two ways to use a clinometer to estimate quantities. In this part we are going to use our instrument to estimate the height of a few objects, namely, a tree and a building. We are going to measure the same object three times. You will need the following:
- Clinometer
- Record sheets
- Pencil or pen
- Tape measure
Step 4. Measure
Measuring Height:
-
Measure an arbitrary distance from the base of the object whose height you are going to estimate. Record this distance in Table 1 below.
-
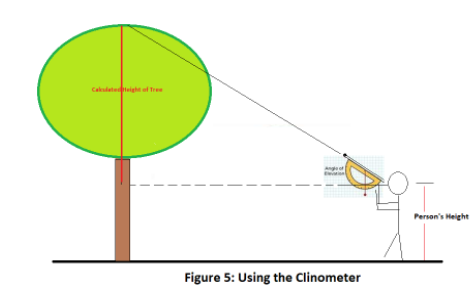
Standing at the measured distance from the object, hold the clinometer so that the plumb line hangs at 0°.
-
Hold the clinometer up to your eyes and tilt it until you can see the top of the object through the scope.
-
Have a helper record in the table the angle that the clinometer now registers.
-
Use these measurements to calculate the estimated height of the object and record the height in the appropriate column in the table. (Remember to add your height to the final calculated value.)
-
Use the clinometer to measure the height of at least three different objects
Measuring distance:
In this part, you will use the clinometer to measure distance.
- Find a building with several floors. You need to know the height of the building. Go to the roof or look out of a window from the top floor.
- Sight an object on the ground in the distance through the scope of the clinometer.
- Measure the angle of depression.
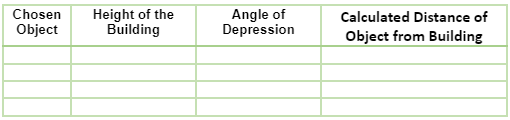
- Record your measurements in the columns of Table 2.
- Using trigonometry, calculate the distance from the building to the object on the ground.
- The final estimates will be the average height and the average distance.
Step 5. Record
Record all your findings in the tables below.
Table 1: Measuring Height

Table 2: Measuring Distance
Step 6. Respond
Respond by filling the required tables of values and by writing a lab report that includes the following:
- An explanation of the trigonometric principles you used in estimating the height of the object.
- An explanation of the trigonometric principles you used in estimating the distance of the object on the ground to the lookout building.
OPTIONAL Step 7: Interact (10 minutes)
If you would like to, you can reply to your peers' posts in a respectful and professional manner. Ensure that your post engages your peers' ideas by including a reflection on their comments, sharing ideas of other potential difficulties and parties involved, or asking thought-provoking questions. If a peer comments on your posting, please reply. To post a reply, click “Reply” on a particular discussion, write your feedback and then click on “Post to forum.”
-
Quiz: Module 6: Lessons 3 - 4
To access the quiz, click on the name of the quiz provided above. On the following screen, click the "Preview quiz now" button to respond to the questions.
TO PASS THIS QUIZ YOU MUST OBTAIN A SCORE OF 80%.
-
Students mustViewReceive a gradeReceive a passing grade
To access the quiz, click on the name of the quiz provided above. On the following screen, click the "Preview quiz now" button to respond to the questions.